Pages

Saturday, 22 December 2018

Three Birds - Two Down and One to Go!


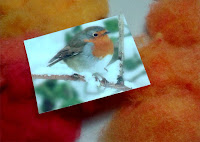
Both the pied wagtail and the robin are finished and have moved to their new homes in time for Christmas. 
The lonely naked cardinal, perching on my work table looks at me accusingly every time I go past. Hopefully I'll be able to start weaving his beautiful red and black feathers soon!

When I made the robin's legs, I developed the best method yet. I made the main structure: legs, loop of wire that slips into the pocket on the underside of the bird, and straight wires below the feet, all in one continuous piece of sturdy wire. The feet I made of more maleable wire. After forming a foot, this wire also went on to be what anchored the foot at the right position and then spiraled up the leg to end up wrapped around the wire loop hidden out of sight inside the pocket. Here are the cardinal's legs waiting to be installed once the weaving is nearly done.

Sunday, 25 November 2018

Beginning to weave: an adjustment to my approach

As I've been preparing the weaving forms I have been working on each phase of the three birds together (all the eyes, all the beaks etc.).  It didn't take me long to realize that this isn't a good strategy for the actual weaving. I expected to weave the heads of all three, then the backs etc. I wove the robin's head and then switched to the pied wagtail. I discovered that the flow that develops as I concentrate on the colours and shapes was interrupted when I switched to the head of the next bird with its very different colour scheme and kinds of markings. As soon as I realized that I continued to work on the pied wagtail, allowing myself to get immersed in the process of the the whole bird. 

Of this bird, my favourite section to weave is the strip of black and white hatch marks on the shoulder. The pied wagtail is now nearing completion with only the tail wire to add and the underside left to cover.

Sunday, 7 October 2018

Three birds - blending and spinning robin's breast colour


With my hand carders I blended three colours from Norwegian Wool to match the robin's breast.

Then I spun it on my spindle and wound it off onto my nostepinne to make a centre pull ball.
From this ball I formed a new two-strand ball by winding both ends (from the centre and from the outside of the ball) together onto the nostepinne.
From this ball, I plied the finished yarn. Now I'm ready to start weaving!

Saturday, 28 July 2018

Three birds assembly and warping

With all the detail of the heads done, I could start assembling the rest of the weaving forms. First I stuffed the head very firmly, packing small wads of stuffing above the eye beads to fill the crown of the head and then more to fill the neck. 

Starting at the centre front I attached the breast piece, matching the marks and stitching the darts as I went. I stuffed the body gradually as it took shape, over stuffing before I tightly laced the final opening under the tail. The form needs to be firm so that the warp threads can be pulled taut without collapsing it.

The main stitch I use for assembling the forms is a lacing stitch. Holding the edges together, I bring the needle out on one side, across the opening, and up through the adjoining edge, then back across and up through the first edge again. The crossing threads draw the two edges together. The interfacing is very thick and non-woven so it takes this kind of firm stitching into the edge without fraying. This is my way of creating curved seams with no need for the bulk of seam allowances. The pieces are cut to the exact final size and shape. All this stitching will be hidden under the weaving, so I don't worry how it looks, but I keep the stitches small and tight so I won't catch them when weaving later.

Attaching the warp was the next stage. I started on the head, catching the warp threads into the buttonhole stitches around the eyes and beak. Then I worked backwards towards the tail. I didn't wrap the warp around the body as a spiral, but as concentric rounds, starting and ending each round on the breast with an overlapped section. Then I took the thread under the fabric and up in the right place to begin the next round.
The warp threads for the tails and the robin's wings are held with contrasting holding stitiches onto the flat weaving surface. These stitches and the weaving surface will be removed after weaving leaving a single layer of woven fabric.

Now that the warp is ready I want to begin weaving, but my plan is to do the stages of all the birds together so first I took an inventory of the weaving yarn that is ready. I have all the colours I need except the robin-breast orange I have isn't blended well and I have only one small ball each of the reds I'll need for the cardinal. Spinning has to be the next step.


Friday, 13 July 2018

Three Birds - Next Steps

Most steps of preparation I could do while all the pieces were still flat. The tails got an extra layer of fabric that serves two purposes: inside the back it creates a pocket to hold the ends of the tail wire; outside it reinforces the underside of the temporary tail form. On the underside of the breast piece I sewed a patch and cut a slit which will be the pocket for the leg wires. I attached the second side of the head for the cardinal and wagtail and the temporary wing forms for the robin. 

Next I cut the holes for the eyes and sewed eyelets of the right size and colour. The method is adapted from the shisha embroidery technique used to apply tiny mirrors to fabric.

I added three rows of holding stitches. The row in wool on the head and down the back in the colours of the weaving will remain in place. The temporary row down each side will be taken out once I have woven down that far. By then the woven fabric itself will hold the warp threads in position on the rounded form.

Next came the fun of attaching the beak and eye beads and assembling the head. The robin and wagtail went smoothly. I suddenly realized I needed a new method for the cardinal's head because of his crest. I need smooth weaving that ends at the back of the head in fluffy tufted/fringed wool. From the pattern I made a form of just the top of the head, warped it and experimented with how the weaving will work (using a plentiful colour, not my newly purchased cardinal red). The first one failed and I threw it away. The next one I wove and unpicked twice before getting the technique right. There will be further experiments to figure out how to brush and trim the crest to shape (and maybe it will need some pva "hair gel"?), but I learned enough to determine that the shape of the head is correct and to develop a method that works to join the pieces and add the holding stitches.

I love this stage. With their eyes inserted and the 3D heads they have begun to look more like birds. They sit there on the table watching me with their bright eyes. My anticipation of the fun of weaving the colours of their feathers spurs me on to finish assembling and warping the forms.

Saturday, 30 June 2018

Three Birds at Once

I'm beginning an experiment to see if making birds in batches will be more efficient. It will mean I can set up once for each short step and move more than one project on to the next level in one go. I began by digging in my bird making files for the patterns and reference for an English robin, a pied wagtail and a cardinal. 

Then I searched through my stash of coloured spun wool and ready-to-spin wool. That was good timing, just before Woolfest last weekend. What fun! I visited Norwegian Wool and selected from their amazing range of coloured wool to fill in the gaps in my stash.

The first step in making the weaving forms was to trace the detailed patterns onto lightweight fusible interfacing. I've colour coded the different marks I need: green for warp lines; black for cutting lines and matching dots; red for darts; blue for edges of coloured areas; and highlighter to fill some coloured areas. (I learned not to use fine liners for this as the ink gradually bleeds and all the detail disappears. Ballpoint pens/biros provide the permanent fine lines I need.)
I dug through my beak fabrics and selected rich red satin for the cardinal and fine black silk for the wagtail. I created a medium grey by colouring some light silk with a black Inktense pencil for the robin. The process of sewing the beaks didn't take long. I pulled out a pair of black beads the right size for each bird: 14.5mm (cardinal), 9.5mm (robin) and 7.5mm (wagtail). This collection of beads has been supplied mostly by my daughters who look in charity shops for necklaces for me.
Next I fused the traced patterns onto heavy interfacing and cut out the pieces. I pinned the first pieces together for the first stage of assembly. 


Sunday, 4 February 2018

Quicker prototypes


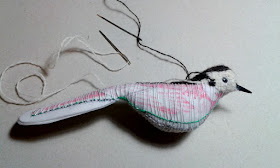
Prototype of a pied wagtail,
markings drawn on before sewing
Over the last while I have devised a quick and reliable way to test my bird shapes. I make a prototype in fabric, either drawing the markings on plain fabric or foundation piecing them before sewing by machine. The eye beads are added inside before stuffing and the beak is sewn on afterwards. 

Pied wagtail weaving form with weaving started
Once I know the design is right, I use the shapes to make a weaving form pattern with all the construction marks and feather markings. I trace all this onto thin fusible interfacing which I fuse onto the heavy interfacing and begin construction.
Finished pied wagtail

Sparrow pattern used for Christmas gifts
As a side benefit, the patchwork birds are lovely things in themselves and make good gifts. I usually make a batch of at least 4 for efficiency.